Introducing the Shell
Last updated on 2024-11-17 | Edit this page
Estimated time: 30 minutes
Overview
Questions
- What is a command shell and why would I use one?
- How can I move around on my computer?
- How can I see what files and directories I have?
- How can I specify the location of a file or directory on my computer?
Objectives
- Describe key reasons for learning shell.
- Navigate your file system using the command line.
- Access and read help files for
bashprograms and use help files to identify useful command options. - Demonstrate the use of tab completion, and explain its advantages.
This lesson has been adapted from the original Data Carpentry - Shell Genomics to be run using the NeSI infrastructure as part of the Otago Bioinformatics Spring School instead of AWS.
What is a shell and why should I care?
A shell is a computer program that presents a command line interface which allows you to control your computer using commands entered with a keyboard instead of controlling graphical user interfaces (GUIs) with a mouse/keyboard/touchscreen combination.
There are many reasons to learn about the shell:
- Many bioinformatics tools can only be used through a command line interface. Many more have features and parameter options which are not available in the GUI. BLAST is an example. Many of the advanced functions are only accessible to users who know how to use a shell.
- The shell makes your work less boring. In bioinformatics you often need to repeat tasks with a large number of files. With the shell, you can automate those repetitive tasks and leave you free to do more exciting things.
- The shell makes your work less error-prone. When humans do the same thing a hundred different times (or even ten times), they’re likely to make a mistake. Your computer can do the same thing a thousand times with no mistakes.
- The shell makes your work more reproducible. When you carry out your work in the command-line (rather than a GUI), your computer keeps a record of every step that you’ve carried out, which you can use to re-do your work when you need to. It also gives you a way to communicate unambiguously what you’ve done, so that others can inspect or apply your process to new data.
- Many bioinformatic tasks require large amounts of computing power and can’t realistically be run on your own machine. These tasks are best performed using remote computers or cloud computing, which can only be accessed through a shell.
In this lesson you will learn how to use the command line interface to move around in your file system.
How to access the shell
On a Mac or Linux machine, you can access a shell through a program called “Terminal”, which is already available on your computer. The Terminal is a window into which we will type commands. If you’re using Windows, you’ll need to download a separate program to access the shell.
To save time, we are going to be working on a remote server where all the necessary data and software available. When we say a ‘remote server’, we are talking about a computer that is not the one you are working on right now. You will access the Carpentries remote server where everything is prepared for the lesson. We will learn the basics of the shell by manipulating some data files. Some of these files are very large , and would take time to download to your computer. We will also be using several bioinformatic packages in later lessons and installing all of the software would take up time even more time. A ‘ready-to-go’ server lets us focus on learning.
How to access the remote server
During this workshop we will be running the material on the NeSI platform, using the Jupyter interface, however it is also possible to run this material locally on your own machine.
One of the differences between running on NeSI or your own machine is that on NeSI we preinstall popular software and make it available to our users, whereas on your own machine you need to install the software yourself (e.g. using a package manager such as conda).
Connect to Jupyter on NeSI
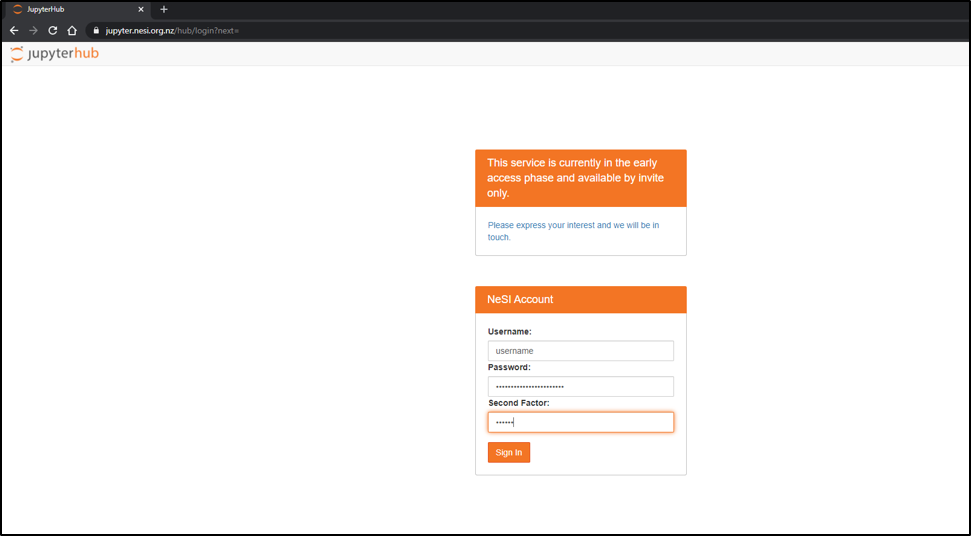
- Connect to https://jupyter.nesi.org.nz
Enter NeSI username, HPC password and 6 digit second factor token (as set on MyNeSI)
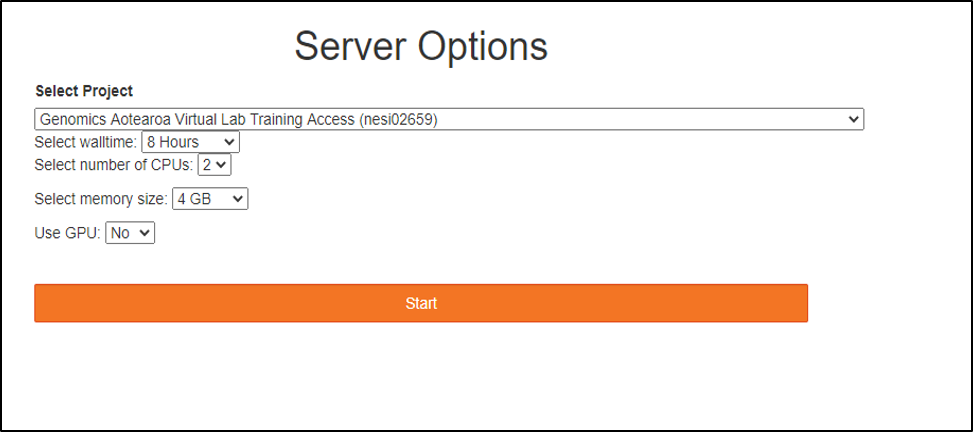
Choose server options as below
make sure to choose the correct project codenesi02659, number of CPUs 4, memory 4GB prior to pressing the Start button.
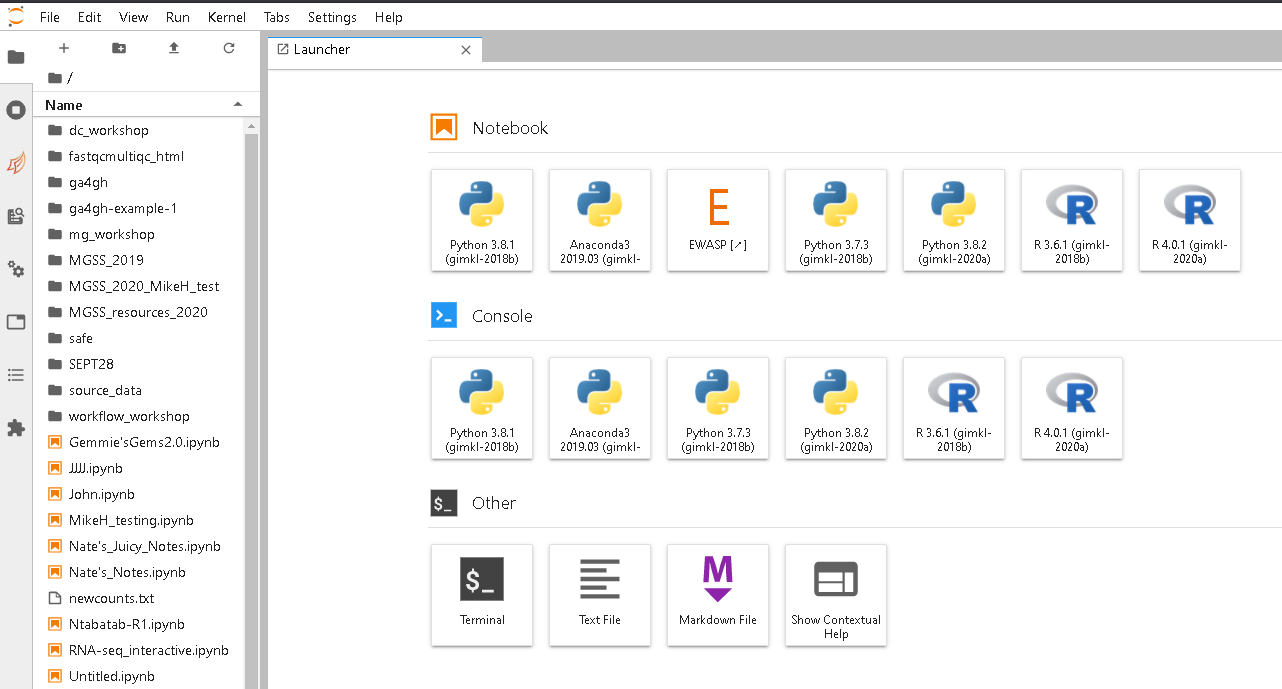
Start a terminal session from the JupyterLab launcher
Callout
You can log-in to the remote server using the instructions
from the Introduction to Cloud Computing for Genomics lesson. Your
instructor will supply to you the ip_address and password
that you need to login.
Each of you will have a different ip_address. This will
prevent us from accidentally changing each other’s files as we work
through the exercises. The password will be the same for everyone.
After logging in, you will see a screen showing something like this:
OUTPUT
Welcome to Ubuntu 20.04.5 LTS (GNU/Linux 5.4.0-137-generic x86_64)

 * Documentation:  https://help.ubuntu.com
 * Management:     https://landscape.canonical.com
 * Support:        https://ubuntu.com/advantage

  System information as of Mon 13 Mar 2023 03:57:46 AM UTC

  System load:  0.0                Processes:             192
  Usage of /:   20.3% of 98.27GB   Users logged in:       0
  Memory usage: 25%                IPv4 address for eth0: 172.31.12.214
  Swap usage:   0%

  Get cloud support with Ubuntu Advantage Cloud Guest:
    http://www.ubuntu.com/business/services/cloud

178 updates can be applied immediately.
108 of these updates are standard security updates.
To see these additional updates run: apt list --upgradable


Last login: Fri Mar 10 03:14:44 2023 from 72.83.168.14
This provides a lot of information about the remote server that
you’re logging into. We’re not going to use most of this information for
our workshop, so you can clear your screen using the clear
command.
Type the word clear into the terminal and press the
Enter key.
This will scroll your screen down to give you a fresh screen and will make it easier to read. You haven’t lost any of the information on your screen. If you scroll up, you can see everything that has been output to your screen up until this point.
Tip
Hot-key combinations are shortcuts for performing common commands.
The hot-key combination for clearing the console is Ctrl+L.
Feel free to try it and see for yourself.
Navigating your file system
The part of the operating system that manages files and directories is called the file system. It organizes our data into files, which hold information, and directories (also called “folders”), which hold files or other directories.
Several commands are frequently used to create, inspect, rename, and delete files and directories.
Preparation Magic
You may have a prompt (the characters to the left of the cursor) that
looks different from the $ sign character used here. If you
would like to change your prompt to match the example prompt, first type
the command: echo $PS1 into your shell, followed by
pressing the Enter key.
This will print the bash special characters that are currently
defining your prompt. To change the prompt to a $ (followed
by a space), enter the command: PS1='$ ' Your window should
look like our example in this lesson.
To change back to your original prompt, type in the output of the
previous command echo $PS1 (this will be different
depending on the original configuration) between the quotes in the
following command: PS1=""
For example, if the output of echo $PS1 was
\u@\h:\w $, then type those characters between the quotes
in the above command: PS1="\u@\h:\w $ ". Alternatively, you
can reset your original prompt by exiting the shell and opening a new
session.
This isn’t necessary to follow along (in fact, your prompt may have other helpful information you want to know about). This is up to you!
The dollar sign is a prompt, which shows us that the shell is waiting for input; your shell may use a different character as a prompt and may add information before the prompt. When typing commands, either from these lessons or from other sources, do not type the prompt, only the commands that follow it.
Let’s find out where we are by running a command called
pwd (which stands for “print working directory”). At any
moment, our current working directory is our current
default directory, i.e., the directory that the computer assumes we want
to run commands in, unless we explicitly specify something else. Here,
the computer’s response is /home/<username>, which is
the top level directory within NeSI:
OUTPUT
/home/<username>Let’s look at how our file system is organized. We can see what files
and subdirectories are in this directory by running ls,
which stands for “listing”:
OUTPUT
obss_2024ls prints the names of the files and directories in the
current directory in alphabetical order, arranged neatly into columns.
We’ll be working within the shell_data subdirectory, and
creating new subdirectories, throughout this workshop.
The command to change locations in our file system is
cd, followed by a directory name to change our working
directory. cd stands for “change directory”.
Let’s say we want to navigate to the
obss_2024/commandline/shell_data directory we saw above. We
can use the following command to get there:
Let’s look at what is in this directory:
OUTPUT
bioc_rnaseq commandline edna genome_assembly genomic_dna intro_rAnd we’ll then navigate into commandline
and take a look
OUTPUT
shell4b_data shell_dataAnd then we’ll cd into shell_data
And take a look
OUTPUT
sra_metadata untrimmed_fastqWe can make the ls output more comprehensible by using
the flag -F, which tells ls
to add a trailing / to the names of directories:
OUTPUT
sra_metadata/ untrimmed_fastq/Anything with a “/” after it is a directory. Things with a “*” after them are programs. If there are no decorations, it’s a file.
ls has lots of other options. To find out what they are,
we can type:
man (short for manual) displays detailed documentation
(also referred as man page or man file) for bash commands.
It is a powerful resource to explore bash commands,
understand their usage and flags. Some manual files are very long. You
can scroll through the file using your keyboard’s down arrow or use the
Space key to go forward one page and the b key to
go backwards one page. When you are done reading, hit q to
quit.
Challenge
Use the -l option for the ls command to
display more information for each item in the directory. What is one
piece of additional information this long format gives you that you
don’t see with the bare ls command?
OUTPUT
total 8
drwxr-x--- 2 dcuser dcuser 4096 Jul 30  2015 sra_metadata
drwxr-xr-x 2 dcuser dcuser 4096 Nov 15  2017 untrimmed_fastq
The additional information given includes the name of the owner of the file, when the file was last modified, and whether the current user has permission to read and write to the file.
No one can possibly learn all of these arguments, that’s what the manual page is for. You can (and should) refer to the manual page or other help files as needed.
Let’s go into the untrimmed_fastq directory and see what
is in there.
OUTPUT
SRR097977.fastq SRR098026.fastqThis directory contains two files with .fastq
extensions. FASTQ is a format for storing information about sequencing
reads and their quality. We will be learning more about FASTQ files in a
later lesson.
Shortcut: Tab Completion
Typing out file or directory names can waste a lot of time and it’s easy to make typing mistakes. Instead we can use tab complete as a shortcut. When you start typing out the name of a directory or file, then hit the Tab key, the shell will try to fill in the rest of the directory or file name.
Return to your home directory:
then enter:
The shell will fill in the rest of the directory name for
commandline and then shell_data.
Now change directories to untrimmed_fastq in
shell_data
Using tab complete can be very helpful. However, it will only autocomplete a file or directory name if you’ve typed enough characters to provide a unique identifier for the file or directory you are trying to access.
For example, if we now try to list the files which names start with
SR by using tab complete:
The shell auto-completes your command to SRR09, because
all file names in the directory begin with this prefix. When you hit
Tab again, the shell will list the possible choices.
OUTPUT
SRR097977.fastq SRR098026.fastqTab completion can also fill in the names of programs, which can be useful if you remember the beginning of a program name.
OUTPUT
pwck pwconv pwd pwdx pwunconvDisplays the name of every program that starts with
pw.
Summary
We now know how to move around our file system using the command line. This gives us an advantage over interacting with the file system through a GUI as it allows us to work on a remote server, carry out the same set of operations on a large number of files quickly, and opens up many opportunities for using bioinformatic software that is only available in command line versions.
In the next few episodes, we’ll be expanding on these skills and seeing how using the command line shell enables us to make our workflow more efficient and reproducible.
Key Points
- The shell gives you the ability to work more efficiently by using keyboard commands rather than a GUI.
- Useful commands for navigating your file system include:
ls,pwd, andcd. - Most commands take options (flags) which begin with a
-. - Tab completion can reduce errors from mistyping and make work more efficient in the shell.